このブログの開発、デプロイ環境をメモしておく。なるべく無料なサービスで構築した
使用ツール
- hugo: ブログ作成用ツール
- netlify: コンテンツのホスティング
- github: コンテンツの登録
- google domain: ドメイン取得
開発環境
ローカルの開発環境は docker を使っている
hugo 設定
開発環境の構築はこちらの docker-compose.yml を参考に作成した
https://hub.docker.com/r/jojomi/hugo/
./srcに hugo のコンテンツが入る
./publicにビルドした静的ファイルが入る
version: "3.3"
services:
hugo:
image: jojomi/hugo:latest
user: "1000:1000"
volumes:
- ./src/:/src
- ./public/:/public
environment:
- HUGO_REFRESH_TIME=3600
- HUGO_WATCH=true
ports:
- 1313:1313
command:
[
"sh",
"-c",
"hugo server -D --watch=true --source='/src' --destination='/public' --bind='0.0.0.0' --disableFastRender --baseUrl='localhost'",
]
web:
image: jojomi/nginx-static
volumes:
- ./public:/var/www
environment:
- VIRTUAL_HOST=localhost
ports:
- 8080:80theme
テーマはhugo-tranquilpeak-themeを使用している
テーマをインストールする、後で github に追加したいので submodule で入れる
cd src/theme
git submodule add https://github.com/kakawait/hugo-tranquilpeak-theme.gitconfig.toml にて
theme = "hugo-tranquilpeak-theme"としておく
記事を書く
hugo コマンドで記事ファイルを生成する
コマンドはコンテナ内で実行する
hugo new posts/post.mdこれで content ディレクトリの指定したパスに md ファイルが作成される
数式を使う
mathjax を使う
公式によると cdn1から取得するのが簡単とある
https://gohugo.io/content-management/formats/#enable-mathjax
の、script タグを追加するのがよさそう
すでに使っているテーマに対して、html を追加するには
./themes/hugo-tranquilpeak-theme/layouts/_default/single.htmlのファイルを
以下にコピーして、script タグを適当なところに追記して保存する
./layouts/_default/single.html
これで tex ライクに数式を書くことができる
デプロイ
デプロイ先はnetlifyにする。build したファイルのホスティング先となる
デプロイ方法
手動(CLI)
https://www.netlify.com/docs/cli/ を参考に cli でデプロイしてみる
npm install netlify-cli -g
netlify loginブラウザでページを開いて、‘Authorize’を選択
cat ~/.netlify/config.jsonに認証情報っぽいのが保存される
を参考にデプロイ先を設定する https://gohugo.io/hosting-and-deployment/hosting-on-netlify/#configure-hugo-version-in-netlify
netlify deployで、デプロイが実行される。最初はデプロイ先のサイト設定の設問があるので、適当に答える Site name や使用する account を答えると、デプロイ先の URL 等が作成される
自動(CI)
github のリポジトリに push される度、自動的にビルド・デプロイさせる
netlify の管理ページから設定できる
netlify ダッシュボードの setting->Continuous Deployment から github アカウントと連携するリポジトリ等の設定する
ビルド方法については
https://www.netlify.com/docs/continuous-deployment/#deploy-contexts
を参考に、netlify.tomlを作成して、リポジトリのルートに登録しておくとビルドコマンドや hugo のバージョンを指定できて便利
以下のように設定した
[build]
publish = "./src/public"
command = "hugo --gc --minify -s ./src"
[context.production.environment]
HUGO_VERSION = "0.50"
HUGO_ENV = "production"
HUGO_ENABLEGITINFO = "true"
...カスタムドメイン適用
ブログには独自ドメインを使用したい
domain はgoogle domainにて取得したものを用いる
カスタムドメインとしてサブドメインにblogを使用したものを登録する
カスタムドメイン設定
netlify ダッシュボードの setting->Domain management
より、Add domain alias から自身のドメインを入力して追加する
以下は、追加後の画面
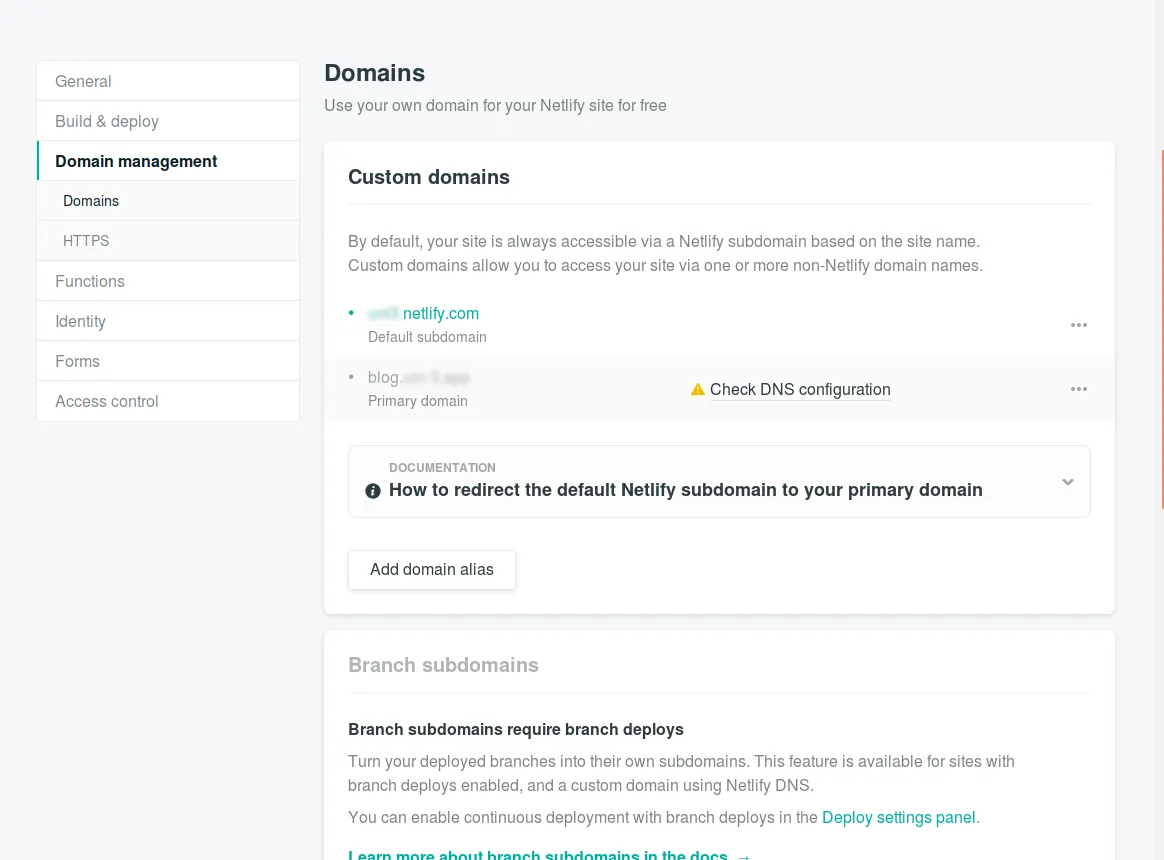
Check DNS configration をクリックして、domain に設定する項目を確認する
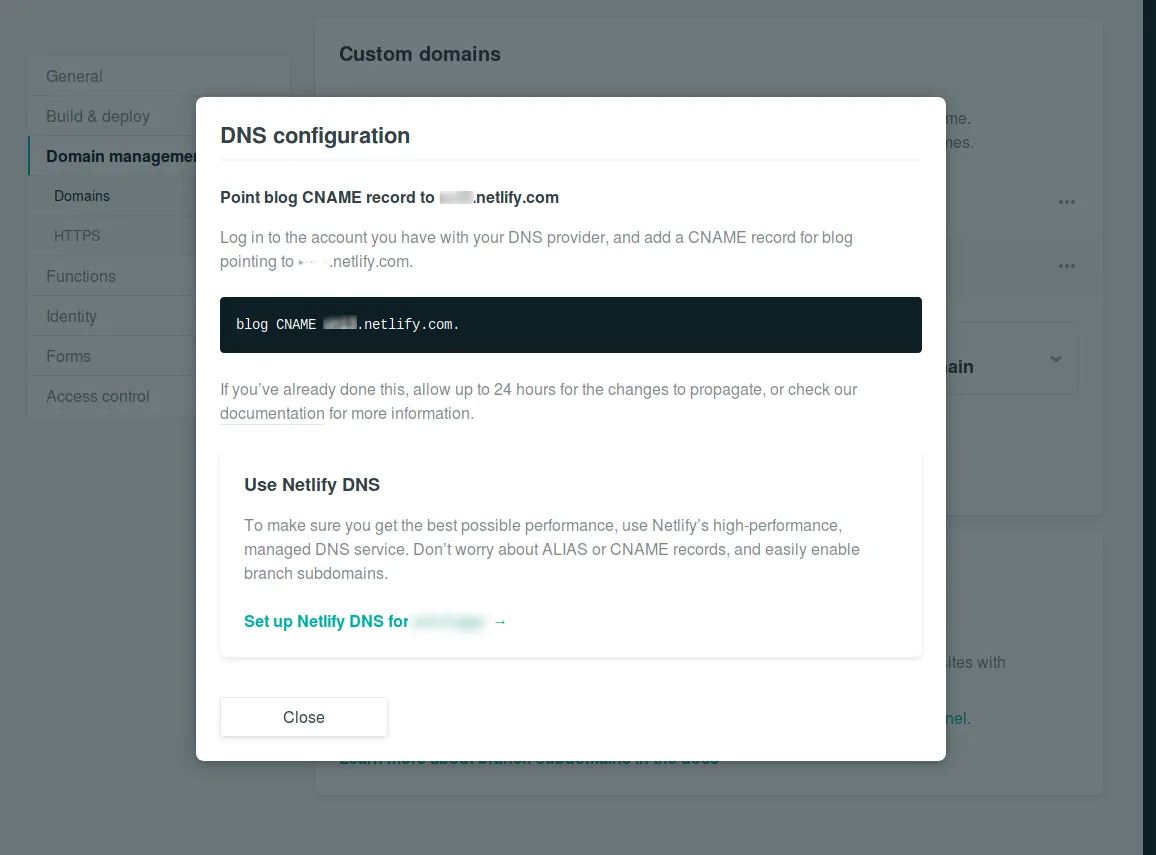
また、https://www.netlify.com/docs/custom-domains/#dns-configuration を参考に
google domain のダッシュボードから Custom resource records を設定する
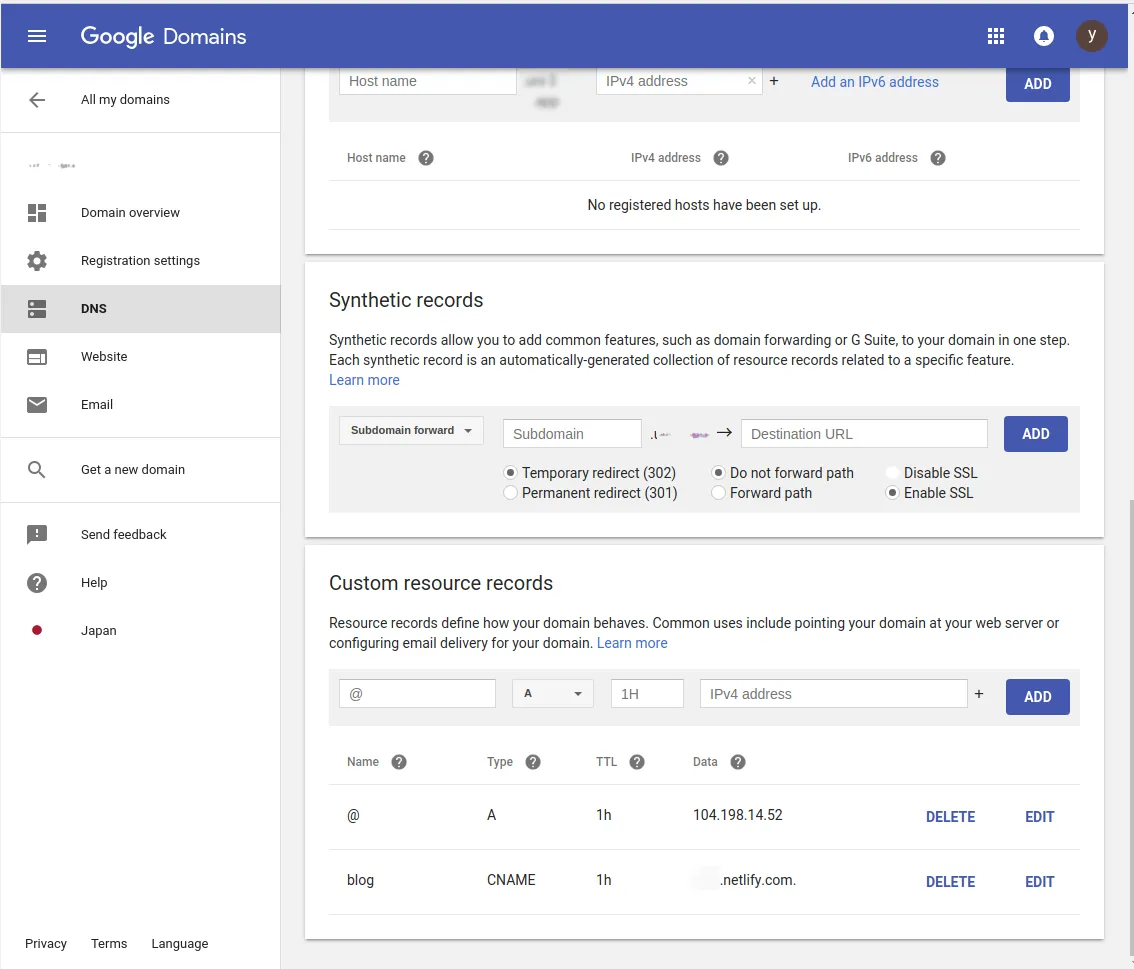
これでしばらく待つと、設定したカスタムドメインで https で閲覧できるはず
netlify.com のページから設定したカスタムドメインへリダイレクトする設定も追加しておくnetlify.tomlに以下を追加する
[[redirects]]
from = "https://'subdomain'.netlify.com/*"
to = "https://'your-custom-domain'/:splat"
status = 301
force = true参考
- https://qiita.com/TakahiRoyte/items/b7c4d1581df1a17a93fb
- https://diwao.com/2018/03/netlify-ssl.html
- https://gohugo.io/getting-started/configuration/