aws sagemaker notebook instanceでpapermillを使う
papermillは、jupyter notebookファイルをcliやpythonから実行できるようにするツール
こちらをAWS SageMakerのnotebook instanceにて使用してみた
ついでにエラーの発生or処理の終了時にslackへ通知する方法も調べてみたので書いておく
実行
- install
!pip install papermill- cliにて実行
!papermill --stdout-file ./log.txt --stderr-file ./log_err.txt --log-output -k python3 \
papermill_test.ipynb papermill_test_output.ipynb \
-f params.yml注意点
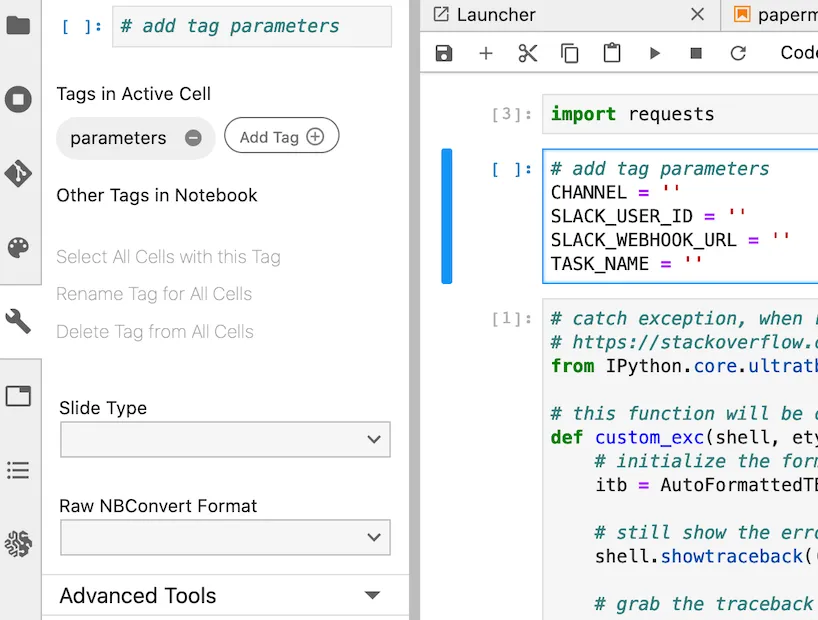
-kオプションにてカーネルを指定しないとnotebookのカーネルconda_python3を使おうとしてエラーが出た--stdout-fileにてファイルを出力しないと、ブラウザを閉じた場合、notebookにてlogが逐次出力しなくなるので、実行過程が見たければログファイル出力するとよい- params.ymlを反映させるにはcellのtagに
parametersと指定して、params.ymlにて記述した変数をcell内で初期化する必要がある。sagemaker notebookのjupyter labでは↓の感じで行う

params.ymlの中身はこんな感じ。slack通知用の設定を入れている
TASK_NAME: 'pm test'
SLACK_USER_ID: 'xxxx' # user_id
# 個人ユーザID or チャンネル名
CHANNEL: 'xxxx' # '#general'
# incoming webhookで生成されるurl
SLACK_WEBHOOK_URL: 'https://hooks.slack.com/services/xxxxx'実行するnotebook
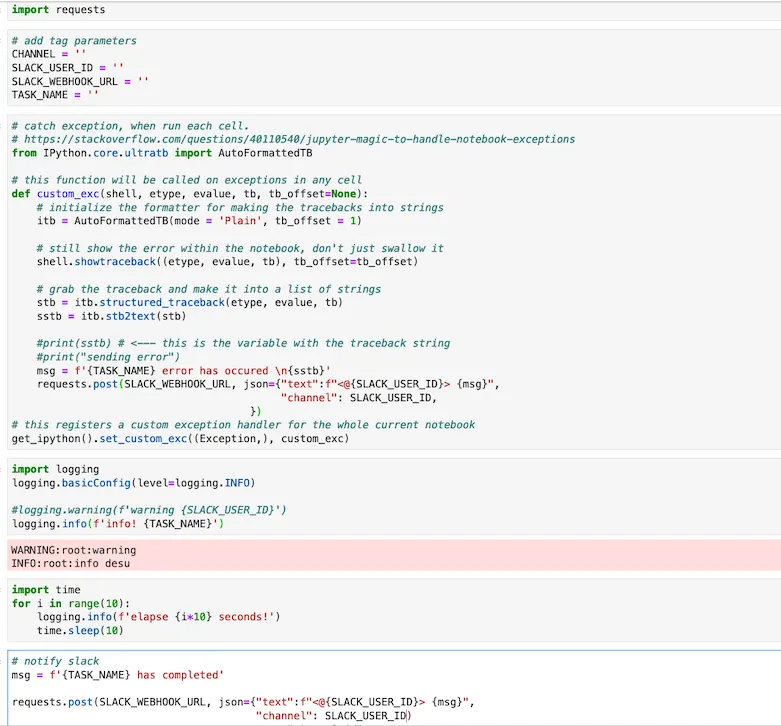
試しに以下のセルを実行させてみる。いくつかコマンドやloggingをしてみる

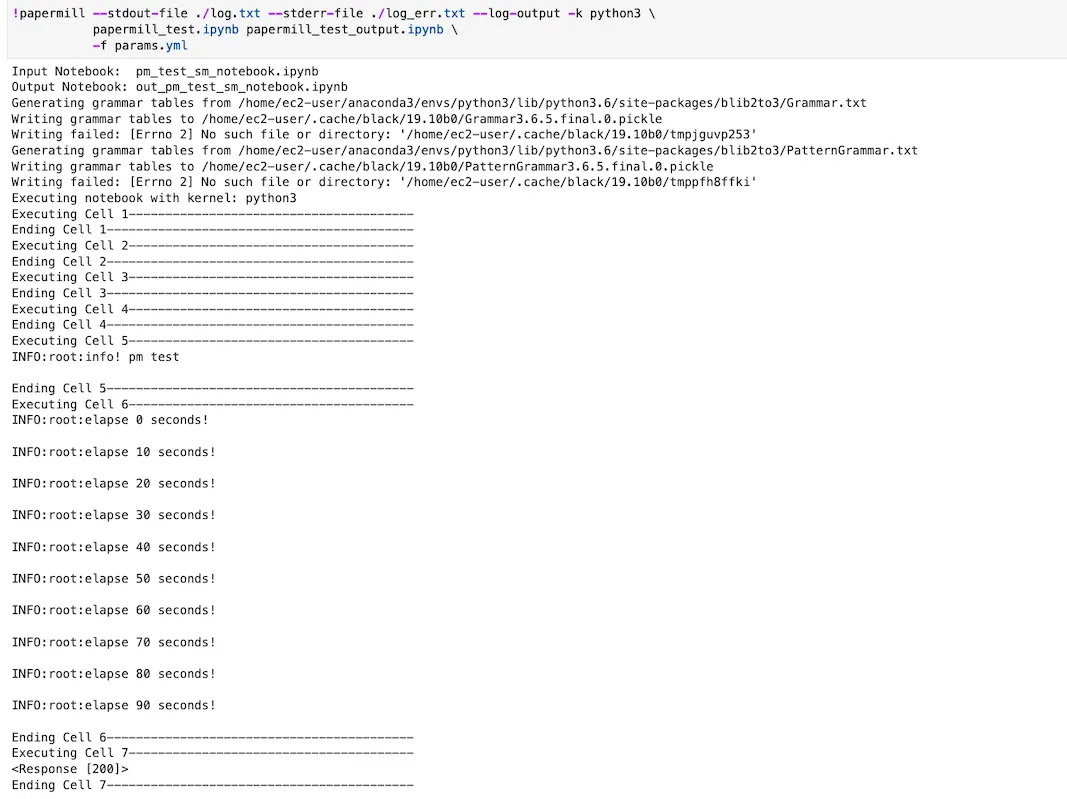
実行の様子
10secごとにprintされる

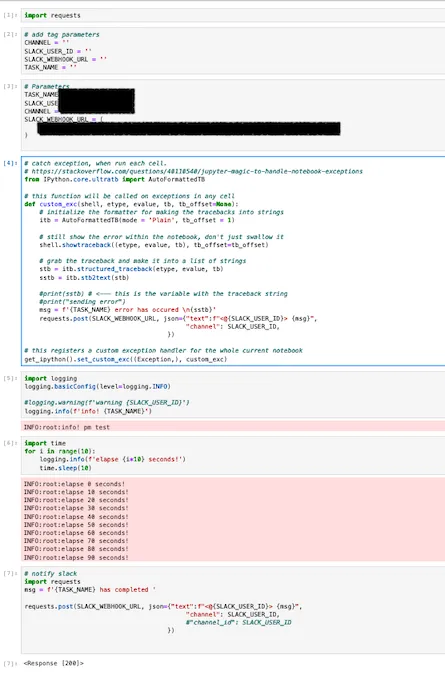
出力されるnotebook
実行時点でのnotebookファイルが作成される。パラメータも埋め込まれた状態で作られる

出力されるlogファイル
コマンドの実行結果やprint()結果が保存される
INFO:root:info! pm test
INFO:root:elapse 0 seconds!
INFO:root:elapse 10 seconds!
INFO:root:elapse 20 seconds!
INFO:root:elapse 30 seconds!
INFO:root:elapse 40 seconds!
INFO:root:elapse 50 seconds!
INFO:root:elapse 60 seconds!
INFO:root:elapse 70 seconds!
INFO:root:elapse 80 seconds!
INFO:root:elapse 90 seconds!slackへの通知周り
成功
最後のcellに通知用のスクリプトを追加すれば良い
@uni pm test has completed# notify slack
msg = f'{TASK_NAME} has completed'
requests.post(SLACK_WEBHOOK_URL, json={"text":f"<@{SLACK_USER_ID}> {msg}",
"channel": SLACK_USER_ID)
#"channel_id": SLACK_USER_ID
})
エラー
こちら↓の情報をそのまま使った。実行セルの最初の方に入れておく。これがあると、exception errorが起きたら、こちらの関数が実行されるらしい
https://stackoverflow.com/questions/40110540/jupyter-magic-to-handle-notebook-exceptions
# catch exception, when run each cell.
# https://stackoverflow.com/questions/40110540/jupyter-magic-to-handle-notebook-exceptions
from IPython.core.ultratb import AutoFormattedTB
# this function will be called on exceptions in any cell
def custom_exc(shell, etype, evalue, tb, tb_offset=None):
# initialize the formatter for making the tracebacks into strings
itb = AutoFormattedTB(mode = 'Plain', tb_offset = 1)
# still show the error within the notebook, don't just swallow it
shell.showtraceback((etype, evalue, tb), tb_offset=tb_offset)
# grab the traceback and make it into a list of strings
stb = itb.structured_traceback(etype, evalue, tb)
sstb = itb.stb2text(stb)
#print(sstb) # <--- this is the variable with the traceback string
#print("sending error")
msg = f'{TASK_NAME} error has occured \n{sstb}'
requests.post(SLACK_WEBHOOK_URL, json={"text":f"<@{SLACK_USER_ID}> {msg}",
"channel": SLACK_USER_ID,
})
# this registers a custom exception handler for the whole current notebook
get_ipython().set_custom_exc((Exception,), custom_exc)わざとエラーになるcellを追加して実行してみる
# name error!
aslackに以下のような通知が届いた
@uni pm test error has occured
Traceback [1;36m(most recent call last)[0m:
[1;36m File [1;32m"<ipython-input-5-af97698a64dc>"[1;36m, line [1;32m2[1;36m, in [1;35m<module>[1;36m[0m
[1;33m a[0m
[1;31mNameError[0m[1;31m:[0m name 'a' is not definedjupyter notebookを使っていて、sessionが切れた時などにブラウザから実行過程を見られなくなることがある
実行にpapermillを用いてlogファイルに出力することにより、実行過程が追えるようになった(本来の用途としては、notebookの実行をシステム的に行ったり、実行時点のものをbackupしたりするためにあるみたいだが)
個人的にはjupyter notebookファイルにて標準出力をlogファイルとして保存する処理を追加するよりもお手軽な気がする
参考
jupter notebookにて標準出力をfileに出す方法